How to write a Krita 'Paint Operation': Introduction
When Cyrille Berger last wrote a Smudge plugin for Krita, I noted that it was laughably simple. So I started thinking: how much could I strip away from it, so that it would be a nice example of how to write a plugin for Krita 1.6, and still be useful. I ended up with a 'Simple Smudge' tool. It is a simplified version of the one we have in Krita: no extensive tablet support, no configuration widget. But I think it is still cool enough. So how will this be going? I will write it in a couple of parts. In the first installment, I'll just show a raw plugin for a paint operation. Meaning it will show up in Krita as such, but it won't do anything at all. Pretty useful, eh? ;) The next time, I'll explain what to add, in order to get a basic brush tool. Basic meaning it will do exactly the same as the Krita tool, but without the pretty adjustments for tablets. After that, I'll explain how to do the actual smudging. Then, maybe, I'll show how to port this plugin to Krita 2. I hope this structure will keep the portions simple enough, so that it will be somewhat easy to follow and digest, yet still be a bit interesting. Note that this first part will be pretty generic (also talking about the general plugin framework), so it will also be interesting for other plugin types. (In the end I'll probably merge all episodes into a single file for easier reading, so stay tuned for that if you want a single read. Also I'm wondering if I should hide the big part of the tutorial, so that you'll see it after you click on the link, but I'm not sure. I'll put the break tag at the end, but complain if you'd rather see it more in the beginning next time, like at the 'What is a paintop?' part like it auto-inserted.)
So, how to begin? If a Krita developer wants to create a new plugin, he usually copies the plugin most resembling what he needs, and then modifies it. Since that's the easiest to do, we'll do the same. But since describing all changes would be boring, I already ripped out a plugin, modified the class names and so, removed all irrelevant code. Download it here. What I'll now do, is tell how to install it, then go over each file, and explain its purpose and how it works. Then next time, we'll actually start editing it.
What is a paintop?
A paintop is a class in Krita that provides different ways on how to draw on a paint layer. By this I mean it in the broadest sense: it tells Krita what to do if a user draws any kind of line: freehand, straight line, rectangle, etc. The user picks a way of drawing lines and a paintop, and then the paintop will get called to put the dots on the layer. You can choose the tool which to draw lines in the toolbox (usually on the left), and the paintop in the dropdown box in the toolbar (usually on the top). There's a picture of that dropdown box a bit below, if you're wondering how it looks like.
How to install it
I'll assume you both have a working Krita install, and know how to recompile a Krita install (it's extremely simple, but not so relevant). Also, I'll put the plugin directly inside the right place in the Krita hierarchy, so that it'll be extremely easy to install it (and later on, integrate it with the actual Krita tree). So start by unpacking your code inside kritacodedir/plugins/paintops/, so you get the paintops/simplesmudge/ directory. All Krita plugins (except file and colorspaces) are handily organized in the plugins directory, so that you can find them easily. Then, change the paintops/Makefile.am to something like
SUBDIRS = <br />
defaultpaintops simplesmudge
So that this directory will get compiled. Now go to your KOffice source directory, do a make -f Makefile.cvs, then reconfigure your KOffice, and make it again. This is a step that you only have to do once, when you added a subdirectory. After this, to recompile and install your plugin, you can go to the directory of the plugin itself, and recompile just that directory, and install it. This is because it's a plugin, if you only change code in the plugin, you only need to recompile this plugin. After you install it, it should show up in Krita, like this: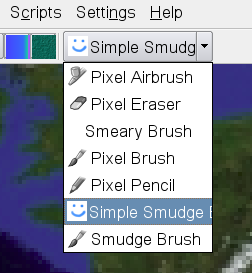
The files
- simplesmudge.png: I'll start with the easiest: this one is the icon that we'll let the paint operation have.
- Makefile.am: Since we're talking about Krita 1.6, we still need makefiles. Basically, if you ever want to create a new plugin, copy an old Makefile.am, change all occurances of the old filenames to your own, and the old plugin names to the new, and hope it'll work. That's how I do it, and it mostly works :D
- kritasimplesmudge.desktop: Krita plugins are actually KParts plugins. So we need to let KDE know about them, through .desktop files. The first part just is standard .desktop stuff to name this plugin with some human-readable names. But then the first Krita-relevant part comes:
ServiceTypes=Krita/Paintop
Type=Service
This is because Krita uses the plugin as a KDE Kpart Service. The Krita/Paintop part means that it will show up in the KTrader query when Krita asks for paintops. When Krita starts, it builds up an internal list of all the paintops KDE knows about. To get these, KDE needs to know which servicetypes this plugin provides. Then it will call the constructor of the plugin (we'll get to that later). Of course, maybe your plugin provides multiple kinds of Krita plugins. This can be done by just making a comma-separated list out of it. For example, the .desktop file of the Wet colorspace provides
ServiceTypes=Krita/ColorSpace,Krita/ViewPlugin
The final part of this file has
X-KDE-Library=kritasimplesmudge
X-Krita-Version=2
The X-KDE-Library lets KDE and Krita know the name of the library this plugin will be located in. The Makefile.am contains kde_module_LTLIBRARIES = kritasimplesmudge.la; it is this filename but without the '.la' part. The X-Krita-Version is currently 2, but can be changed in the future. This is a marker that Krita can use to not load a certain plugin because it is too old. Sometimes, the Krita API or ABI changes, and if we would load all plugins written for the old interfaces, you'd get weird bugs or even crashes!To test if it works, you can list all plugins that provide Krita paintops for the ABI version 2 with ktradertest:
$ ktradertest Krita/Paintop "" "(Type == 'Service') and ([X-Krita-Version] == 2)"
or if you want to only show your plugin:
$ ktradertest Krita/Paintop "" "(Type == 'Service') and ([X-Krita-Version] == 2) and ([Name] == 'Simple Smudge Paint Operation')" - simplesmudge_plugin.h: This is the header file for the code that will get called when Krita wants to load us as a paint operation. It basically says we're a KParts::Plugin, and that's about it.
- simplesmudge_plugin.cc: This is the implementation file for the previous header. On how the KDE plugin-technic part works, I happily refer to Building a Plugin Structure for a KDE application. It's really interesting, plus, it shows you that writing a plugin structure for your KDE application is trivial.
Now on to the Krita part. What can happen is that this plugin gets created multiple times, for example if you both provide a colorspace and a paint operation. To ensure that you only add your paintop once, build in the switch. What you now want to do is add your operation to the registry of known paintops. So you cast the parent object (it's a QObject*) to a KisPaintOpRegistry*. Then add your KisSimpleSmudgeOpFactory to it (we'll get to that, too). Basically, that's it, from the plugin side. - kis_simplesmudge.h: Ah, now we're getting there. This is the header file for the actual paint operation. It defines both a KisPaintOp and it's KisPaintOpFactory. The factory is a class, so that you can keep a single instance of it around, and you can ask it to produce a new, fresh KisPaintOp for Krita. Of course you want this to be your own paintop, the KisSimpleSmudgeOp. Let's start with the factory.
- KisID id(): A KisID is an object that couples an internal identifier (the first argument), to a user-visible identifier. The user-visible part will be shown in the dropdown-box, so make sure you i18n it (this ensures that it can get translated to the native language of the user's desktop).
- QString pixmap(): This returns the filename of the image that will be shown for your paintop in the list
- KisPaintOpSettings *settings(QWidget* parent, const KisInputDevice& inputDevice): This function is needed if you want to add extensive tablet support. We won't be needing it for this howto, so we'll let it return a null-pointer.
- KisPaintOp* createOp(const KisPaintOpSettings *settings, KisPainter * painter): This is the actual factory method. If this function gets called, you have to construct your own paintop, based on the settings and the given KisPainter. Since we don't need the settings parameter, we can just ignore it.
So, that was it for this time. Next time, I won't be boringly describing files, but tell what to add in just a single file, on how to make yourself a very simple brush paintop. After that, we'll be changing only that same file to make it smudge your pictures. I don't know yet when I'll do those parts yet, but given that I'm supposed to be studying, expect it sooner, rather than later ;)
Bibliography
- KTrader Class Reference if you want to know more about KTrader
- Building a Plugin Structure for a KDE application about how to write your own plugin structure with KDE, like Krita does.
- kis_smudgeop.h kis_smudgeop.cc defaultpaintops/ WebSVN links to the actual Smudge Paintop implementation of Krita 1.6
- Krita the Krita homepage
- Developing Krita Plugins the reference manual on Krita plugins. This is about all kinds of plugins, like paintops, colorspaces, filters, etc.